Last Updated on March 14, 2023 by Henry T. Hawkins
If the radio in your car turns on but no sound comes out, inspect the following components: blown fuses, wiring shorts, input faulting, and damaged speakers or wires are all possible causes. It might also be an easy answer, such as the source or audio output device.
When you turn on your car radio, you expect to hear music. But sometimes, even though the radio turns on, there is no sound coming out of the speakers. This can be a frustrating experience, especially if you are trying to listen to your favorite station on the way to work. In this blog post, we will explore some of the reasons why your car radio might not be playing sound and how you can fix it.
Your car radio isn’t working for a variety of reasons, and the following are the four most common ones:
- A blown fuse (kind of electrical short)
- Speaker failure or speaker wiring fault
- Bad antenna or tuner
- Interference with anti-theft technology
Why does Car Radio turn On But No Sound?

Before we get into more technical difficulties, let’s go through and see which component might be to blame for no sound being produced and whether some “simple” errors may be as easy as flipping a switch to make your radio blare once again.
Quick simple errors:
- Is your audio output level at full blast? (Eg: Your phone is connected, but the volume on your mobile is off.)
- Is everything linked up correctly like all wires?
- Is this the correct site for you? (Toggle across: AUX, radio / Tuner , USB, Bluetooth) Are you on the right track?
- Is your source still functional? (Test changing songs, CDs, or radio stations)
Hopefully, it’s just one of these problems since they’ll be easy to repair and won’t have any long-term effects on your vehicle’s audio system. If not, we must determine which component or components are preventing no sound.
What are some of the components that cause no sound? Which one is it?
The most effective approach to figure out which component is causing the problem is to start at the source of audio/sound and work your way down to see if you can correct it as you go.

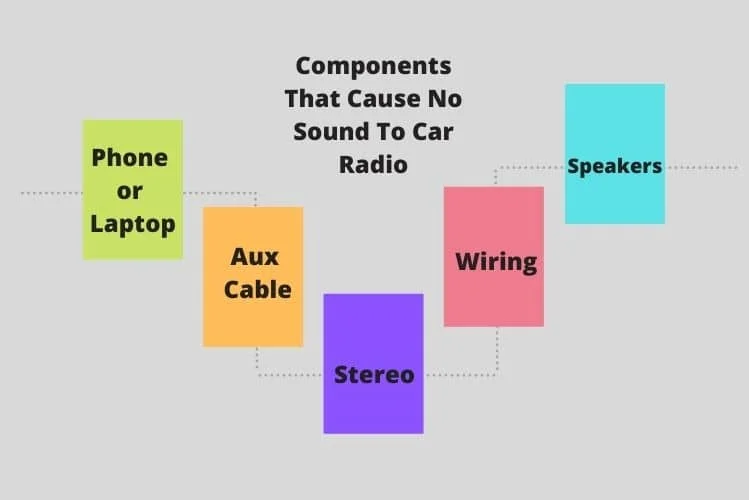
You may inspect your parts in the following order, as shown in the illustration above. This way, you may eliminate working components:
Source (Phone or Radio): Is the sound playing when your car stereo isn’t plugged in? Is the volume turned up? Yet still, no sound can be heard?
Cable (AUX or USB): Is the cable connected firmly or loosely? Is it compatible with other gadgets?
Stereo: Is the stereo on? Is it in the correct mode? Is the amp functional and turned on?
Wiring: Are there any shorts in the wiring? Is the wiring damaged? Are the speakers getting enough power?
Speakers: Are all of the speakers working? Are they plugged in correctly? Do they have any damage to them that is preventing sound from being emitted?
Radio Turns On But No Sound
It’s easy to become confused when a radio turns on, but no sound comes out. You can see that it is switched on and the lights are flashing, or you may view verbal communication on the screen.
The good news is that it will not be totally destroyed because it’s still receiving electrical power. The bad news is that you’ll have to figure out where the fault in the chain of components occurred.
The following are specific solutions to problems in which the radio or automobile starts up, but no sound comes out of the speaker.
If the radio doesn’t work, there are a number of things you can try. Before attempting any of these solutions, make sure the problem isn’t with the speaker (burned out the amp, blown a fuse, etc.) Here are some suggestions if your radio is not functioning:
Master Reset
Some people reported that a master reset solves the no-sound issue. The method will differ based on your vehicle or stereo type.
Reset the endearing process on a complete master by performing a gentle reset, which simply turns off the ignition and shuts down the car. Some new vehicles will even require you to get out of the car, lock it, turn it off entirely, and return to your seat.
Software Update
Some users claim that upgrading the software to the most recent version eliminates the problem. This approach may differ depending on your automobile’s model. You should consult your car’s handbook or look for “how to update YOUR CAR MODEL stereo software” on YouTube or Google.
Unplug And Plug The Fuse
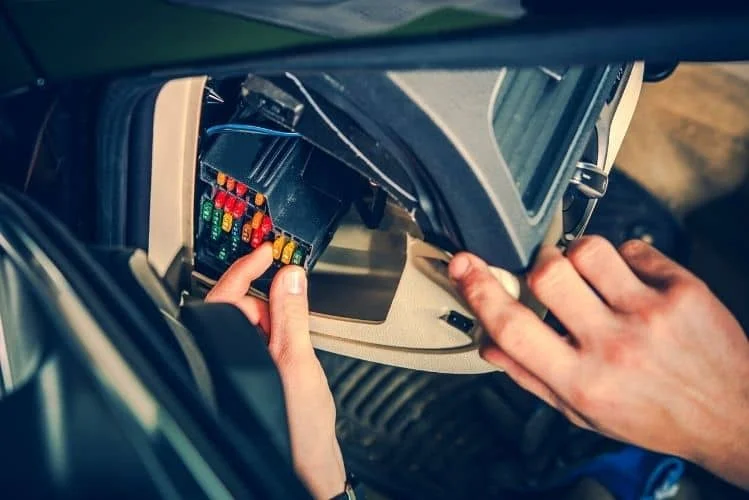
Another option is to unplug and replug the fuse clip. You will find this fuse clip below your steering wheel and at the level of the pedals. Simply plug in and open the radio’s power cable, tidy up the connections, and try your radio again.
Audio Control Module
Unfortunately, if none of the solutions above worked, the problem may be related to the Audio Control Module components. This component of your car tells you what functions and features are available at any one moment. So you’ll either have to reflash it or replace it entirely.
If you’re not sure what to do, hire a professional to assist you. They are experienced in installing new car components, particularly if you don’t know anything about automobile electronics.
If you want to save money by doing it yourself, you should know how to install new car components. If you don’t know, we recommend that you seek expert assistance in this case since they are trained in putting together new automobile parts.
What about blown fuses, wiring shorts, input faults, and damaged speakers or wires?
If your car radio is still having issues, there’s a chance that your fuses have blown, wiring shorts exist, input faults exist, and speakers or wires are damaged. We’ll go through these things and how to replace them in this section.
1. A Blown Fuse

Like other electrical equipment, Car radios are likely to contain a fuse(s) that protects them from power surges and other electrical factors.
If the excess current is released to the vehicle’s audio system, it might cause the fuse to blow and disconnect the circuit to preserve the radio.
Fuses are easy to check. The majority of automobile radio fuses are at the rear of the radio. Anyone familiar with the basics of a voltmeter or electrical continuity meter should be able to look for the fuse.
You can replace the blown fuse and get your radio cranking again. Still, anything that causes the new fuse to blow quickly after installation will necessitate an auto repair since it indicates something wrong with the electrical system that an expert can only view.
How to Replace a Car Radio Fuse in 5 Easy Steps
Things you need:
- Car manual
- New radio fuse
- Needle-plier, twizzer, or fuse puller to remove the fuses.
Step 1: Shut off the car in your parking
You should not leave the engine running while changing your car radio fuse. Look for a safe place to park your automobile and turn off the engine when you detect the need to replace your car radio fuse.
Step 2: Locate the fuse box
Most automobile radios have a fuse panel on the driver’s side of the dashboard. It can, however, be found beneath the vehicle hood or within the engine compartment.
To avoid the trouble, read your vehicle’s handbook for comprehensive information.
Step 3: Examine the diagram for faults
Once you’ve found your fuse, study the diagram carefully. To determine the radio fuse, keep reading to the owner’s manual. Look for a well-labeled diagram on the back of the fuse block cover to identify it.
This circuit map shows all of the fuses in the fuse block and their amperage ratings. Knowing the resting amperage will assist you in quickly replacing a blown fuse.
Step 4: Remove the radio’s fuses using a fuse puller
Use the fuse puller to remove the radio fuse from its socket in the fuse block. Use needle-nose pliers or tweezers to take out the radio fuses from their sockets.
If the fuses are corroded, check for the little metal bar at the center of the fuse; if it is burnt through, you’ll need to replace it with a matching fuse having the same voltage and color.
Step 5: Replace the burnt fuse with a new one
Replace the blown fuse with a new one of the same rating as the one you removed.
To check whether your key works in the ignition, put it in the accessory slot and turn on your radio. As soon as the music begins to play, switch off the radio and reassemble it in the same manner you took it apart.
2. A faulty speaker or defective speaker wiring
If the wires to the speakers are incorrectly linked, there’s a good chance they won’t blare when they’re supposed to.
It’s also possible that your speaker is wearing out because of overuse or harsh weather conditions. The design of speakers is intended to create sound waves, and as they become older, they become less effective.
Crackle noises that issue from the stereo, which may deteriorate with time, can be a reliable sign.
What you need to know about replacing a damaged speaker
You don’t need to be an expert to replace a faulty speaker, as you would a defective fuse. The techniques outlined below should have you nodding your head to the music in no time.
Tools and materials needed:
- Screwdriver (for removing the old speakers surround)
- Glue (for attaching the new speaker surround)
- New speaker surround
- New speaker voice coil (for replacing damaged ones)
- Knife (to loosen internal screws of an enclosure using a screwdriver or other tool that fits securely in your slot)
- Scissors (to cut the wire and remove insulation)
- Sandpaper
Step 1: Remove the speaker that isn’t working
To remove the speaker, start by removing the mounting screws with a screwdriver. The enclosure of the speaker will be opened as a result of this.
When you’re done, remember to turn off the engine and unplug all the wires linked to the speaker.
Step 2: Remove the surround from the speaker
There are two methods for dealing with this, and both are unsatisfactory.
The first step is to use a sharp object, such as a knife, to poke a portion of the old foam surrounds out of the faulty speaker. Carefully remove the surrounding from the stab area using this hand.
You must exercise extreme caution while doing this to avoid tearing the paper cone.
The second technique is to cut out the surround with a scissor instead of your hand, which is safer and neater.
Step 3: Remove the speaker’s voice coil, old glue, and cone
Remove the cone of the speaker with a knife. Before removing the voice coil from the speaker, make sure all terminal wires are disconnected. After this procedure, use sandpaper to scrape off any visible glue residues.
Step 4: Clean the speaker if it’s dusty
To remove dust from the speaker, use a compressed air cleaner to blow it out. You may also use a soft cloth to clean out the corners and core of the speaker—take great care when doing so.
Step 5: Replace the old voice coil
Remove the existing voice coil and replace it with the identical one from the shop. Replace the new voice coil in its original location, as seen before.
Step 6: Place the cone in the voice coil before continuing
Apply some glue to the voice coil, then place the speaker cone on it and allow it to dry for a few minutes. It will ensure that the adhesive is strong enough to hold the speaker cone securely.
Step 7: Fit the new surround
Remove the old surround, then stick a fresh one in its place. Place the new surround in the same position and allow time for the glue to dry completely.
Step 8: Reassemble the speaker in its original location
After replacing the surround sound, reconnect all wires to the speaker, then reattach any removed mounting screws.
Test your speaker at a low volume to see how it sounds. Increase the volume gradually and carefully to observe the change.
3. The Antenna or Tuner is Broken
If you’re having problems with your radio but not your CD player, it’s most likely that your radio antenna is fried. If the problem is in the other direction, check to see if your radio’s tuner is broken. Before attempting a do-it-yourself fix, be sure of the issue.
The most recent automobiles have wires running beneath their windshields in place of traditional metal antennas, and a faulty wire antenna will need to be repaired by a professional. You may always replace an outdated antenna by yourself.
How to replace a broken antenna
You’ll need the following items:
- Screwdriver
- Pliers
- Wrench
- Lithium grease
Step 1: Replace the broken or damaged part
If your car antenna is at the back of the vehicle, you’ll have to remove the trunk panels to get to it. The fender units are often placed in the engine compartment or behind the fender.
Use your screwdriver and wrench to remove the strap, antenna odd, and any other attachment in that location.
Remove the entire antenna assembly by pulling down the mast over the fender, but be careful with the connections.
Step 2: Find out where the problem began
Remove the screw covers, gear cover, and housing shield, but be cautious when removing the housing and gear cover to prevent the cord from springing out from inside.
Look out for the gearbox, motor, and rope. If you find that the rope’s teeth have been damaged, you’ll need to replace the whole mechanism.
Step 3: Make the adjustments necessary
Remove the bushing on the guide tube to remove the mast if it’s causing problems. Remove the mast utilizing pliers or your hand after cleaning out the entire area with dish soap and apply some lithium grease across it as a whole.
Step 4: Place the assembly back together
Finally, after the cleanup, replace the assembly. If you acquire a new one, repeat this procedure. Before securing the base into the entire system, make sure to completely lower the mast before connecting the nylon rope to the tube.
Stretch the antenna entirely before connecting it to the cord’s base and gear drive. Then assemble the housing and cover.
Connect the electrical connections after fitting the mechanism — this will cause the mast to retract — if it doesn’t happen, then you didn’t do a thorough enough job, and you’ll have to repeat the process.
After everything has been completed, your radio should be up and running.
4. Anti-theft interference signals
Anti-theft systems are one of the most common causes of radio problems. You may need to input a code for everything to function correctly in certain cases.
A dead or disconnected car battery is another typical cause. As a result, double-check that you’ve got the proper code before removing your automobile’s battery any more than absolutely necessary.
In general, car wiring has long been an issue with radios that aren’t designed for the vehicle.
If you want to save time and effort, you can always hire a professional.
Wrapping up:
Thanks for reading the complete guide about my car radio turns on but no sound. We hope you’ve found this guide helpful and that you’ve already diagnosed the issue and successfully fixed it.
If the problem still persists, we recommend seeking help from a professional. They will be able to help you diagnose the issue and make the necessary repairs.
Sometimes, replacing a simple fuse works better than purchasing a new radio. Be sure to check all of your fuses before concluding that your radio is irreparable.
In any case, we hope you’ve found this guide helpful. If not, be sure to search for additional help online or contact us directly, and we’ll do our best to assist you.

